jordi
Full Member
 A simple solution is the smarter one.
Posts: 106
|
Post by jordi on Aug 16, 2020 10:03:45 GMT -5
Hi,
I am trying to use this piece of code to send a tiny basic command to Arduino Nano.
THe lights in arduino show it is received, but it does nothing.
Do you know why?
I am basically trying to write and read to the serial port.
---
print "Sending Serial Command Test 1" print "" Com = 16384 open "com14:4800,n,8,1,ds0,cs0,rs" for random as #commHandle for I = 1 to 10000 next I print #commHandle, "dwrite 4,lo"; for I = 1 to 10000 next I close #commHandle print "done" print "" for I = 1 to 80000 next I end |
|
|
|
Post by Rod on Aug 16, 2020 11:02:38 GMT -5
First get rid of the for timing loops. Then step through the code with the debugger, ladybug icon. Give the port a second or two to establish after the open command. If it does not respond to the message try terminating with chr$(13) and not ;
Report back. Also give us a link to the sketch code/example
|
|
|
|
Post by Rod on Aug 16, 2020 12:41:01 GMT -5
I am asking for the Sketch because if you are using serial you cannot just write arduino code and expect it to be interpreted. You must write a Sketch that monitors the port and reads and interprets the message then jumps to a Arduino code block that switches the digital pin. There are examples on the LBPE but first off lets see your Arduino code that receives and interprets the message from Liberty.
|
|
jordi
Full Member
A simple solution is the smarter one.
Posts: 106
|
Post by jordi on Aug 16, 2020 14:55:01 GMT -5
Hi Rod,
Thank you. I have done what you said.
I am actually communicating with a small computer I did that uses 2 nanos. It is based on Rob Cai mini computer with vga, with some additions I did as sound piezzo, a wooden box, a volume control, on led indicator, a switch to set speaker or headphone, headphone jack, and an on/off switch and a 9v battery holder.
I also added support for spanish keyboard.
It runs Tiny Basic by bluejamma. It is Tiny Basic sketch who listens the serial port to execute the commands.
What I try to do is to build my own Putty-like app in liberty basic, and for that I need to write to the serial like when Putty connects and read what tiny basic replies.
In Putty it works well.
I have replaced the line to add +chr$(13), but it still doesn't work.
print #commHandle, "dwrite 4,lo"+chr$(13);
I wanted to tell TinyBasic to set the pin 4 to low (I can use low or lo). It turns on a led on an RGB led of common +.
THis is the code by Brian Archer:
---
'Basic Serial Port Generator.
'Written by Brian Archer
'No originality is claimed for this program
'START
print " At start "
'This sets the foreground and background screen colours
BackgroundColor$ = "blue"
ForegroundColor$ = "yellow"
'xxxxxxxxxxxxxxxxxxxxxxxxxxxxxxxxxxxxxxxxxxxxxxxxxxxxxxxxxxxxxxxxxxxxxxxxxxxxxxxxxxx
'Setting up the Push Button positions and control procedures.
button #dialog2.accept, "Test 1", [Test1], UL, 10, 55 ' i.e. the box you click etc.
button #dialog2.accept, "Quit", [Quit], UL, 10, 85 ' i.e. the box you click etc.
'xxxxxxxxxxxxxxxxxxxxxxxxxxxxxxxxxxxxxxxxxxxxxxxxxxxxxxxxxxxxxxxxxxxxxxxxxxxxxxxxxxx
UpperLeftX = 300
UpperLeftY = 2 'this sets the hight of the window from the top of the screen.
WindowWidth = 300 'this set the width dimension of the window.
WindowHeight = 200 'this set the hight dimension of the window.
'xxxxxxxxxxxxxxxxxxxxxxxxxxxxxxxxxxxxxxxxxxxxxxxxxxxxxxxxxxxxxxxxxxxxxxxxxxxxxxxxxxx
'open "Buttons" for dialog as #dialog2 'This is the screen push buttons
open "Element 14 Jbasic Test Program" for dialog as #dialog2 ' name of the window, that appears at the top of the blue screen.
print #dialog2, "font courier_new 8 italic" ' font type.
print #dialog2, "trapclose [Quit]" ' end your text command.
wait
[Test1]
print "Sending Serial Command Test 1"
print ""
Com = 16384
open "com14:4800,n,8,1,ds0,cs0,rs" for random as #commHandle
print #commHandle, "dwrite 4,lo"+chr$(13);
close #commHandle
print "done"
print ""
wait
end
[Quit]
print "At Quit"
print ""
close #dialog2
print "Program Stopped"
end
--
|
|
jordi
Full Member
A simple solution is the smarter one.
Posts: 106
|
Post by jordi on Aug 16, 2020 15:06:15 GMT -5
Sorry Rod! I did not understand. Yes the line
print #commHandle, "dwrite 4,lo"+chr$(13)
works, I did not remove the ; after it
The light turns on, so it means Tiny Basic receives Liberty Basic command
Now I need to read what the computer says back(what it prints on the serial)
|
|
jordi
Full Member
A simple solution is the smarter one.
Posts: 106
|
Post by jordi on Aug 16, 2020 15:13:58 GMT -5
I looked at this page: alycesrestaurant.com/lbpe/AccessingSerialPort.htmlI used a part of the code to read the serial. In this code it reads the messages, then does the pin high, and reads the result again. I think now I can do the program I wanted . Thanks a lot Rod! I was very confused with the chr$(13) thing --- REM leer monitor while numBytes=0 numBytes = lof(#commHandle) wend dataRead$ = input$(#commHandle, lof(#commHandle)) print dataRead$ REM encender luz print #commHandle, "dwrite 4,hi"+chr$(13) REM leer monitor while numBytes=0 numBytes = lof(#commHandle) wend dataRead$ = input$(#commHandle, lof(#commHandle)) print dataRead$ close #commHandle |
|
jordi
Full Member
A simple solution is the smarter one.
Posts: 106
|
Post by jordi on Aug 16, 2020 16:07:41 GMT -5
For those who want to try something similar, I use this code to send the commands:
[enviarComandos]
print #main.comandos, "!contents? comandos$"
print #commHandle, comandos$;
print #commHandle, chr$(13);
print #main.comandos,""
print #main.comandos, "!setfocus"
It seems using comando$+chr$(13) for some reason sends intro two times.
But if you use only your commands, it doesn't insert the chr$(13) it needs
The solution is to use the ; and in the next line send the chr$(13) with ; to supress the extra characters
|
|
|
|
Post by Rod on Aug 17, 2020 2:56:33 GMT -5
It should not be sending twice. The key to understanding what is going on is to know what your Arduino is expecting. Messages can be terminated in many ways. Chr$(0), chr$(13)+chr$(10), chr$(10) or even "*". It depends on what the Arduino has been programmed to look for.
The article is a little old now, the new form of coding drops the print statement and the comma so #commHandle comandos$ might be all you need. Notice that I did not terminate with a ; so chr$(13)+chr$(10) are added to the end of the message. perhaps this is what the Arduino needs.
Try
#commHandle comandos$
#commHandle comandos$;chr$(13);
#commHandle comandos$;chr$(13);chr$(10);
#commHandle comandos$;chr$(10);
till you find out exactly what terminator the Arduino is happy with.
|
|
jordi
Full Member
A simple solution is the smarter one.
Posts: 106
|
Post by jordi on Aug 17, 2020 5:01:35 GMT -5
It seems now it sends ok, but the received lines print an empty line in between, like a double intro.
Bla Bla Bla
Bla bla bla
Instead of:
bla bla bla
bla bla bla
Maybe the read routine needs improving
|
|
|
|
Post by Rod on Aug 17, 2020 5:06:42 GMT -5
You are probably sending an extra terminator or more data than it needs. If it is expecting a fixed length message then no terminator is required. Again knowing what the Arduino is expecting is the key. Is there a web resource showing the arduino project?
|
|
jordi
Full Member
A simple solution is the smarter one.
Posts: 106
|
Post by jordi on Aug 17, 2020 5:26:37 GMT -5
|
|
jordi
Full Member
A simple solution is the smarter one.
Posts: 106
|
Post by jordi on Oct 10, 2020 9:14:45 GMT -5
Here is what I've done. This is based on Bob Cai computer: www.instructables.com/Arduino-Basic-PC-With-VGA-Output/In his instructable, he sets two Arduino Nanos. One controls the vga output, and the other runs the ps2 keyboard and Tiny Basic. I have added improvements in hardware: a buzzer, a reset button, a 9V battert clip, a on/off plug, a headphone jack, volume knob, a RGB led that can be controlled programmatically, with a plug to set it off in case that you want to use the pins that the led uses for another thing, it also has an integrated knob for analog 0, and I also added a "user port" in one side, with all the pins that are not used, so if I want to plug some sensor, I can do it without opening the case. I also added 5V and 3V and GND pins, and a RX pin. All this is enclosed in a small wood box that is painted in oak color to make it look better. The software of my computer is Tiny Basic, although I learned how to add new commands, and have added some new commands. At the same time, with Liberty Basic I have made a terminal program. It can connect to the port you tell it, at the wanted speed. I have added the capability to load and send a program in txt file to the microcomputer, and also added that when I use the list command, it can save to a txt file. This way, it is easy to load and save. I love this project, it is very fun to do both soft and hardware.
Attachments: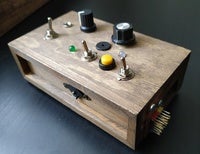
|
|
jordi
Full Member
A simple solution is the smarter one.
Posts: 106
|
Post by jordi on Oct 10, 2020 9:15:49 GMT -5
This is the Terminal program. It also displays a pin guide and has a paste button to directly paste and enter a list in the micro. Attachments:
|
|
|
|
Post by Carl Gundel on Oct 10, 2020 11:05:03 GMT -5
Here is what I've done. This is based on Bob Cai computer: www.instructables.com/Arduino-Basic-PC-With-VGA-Output/In his instructable, he sets two Arduino Nanos. One controls the vga output, and the other runs the ps2 keyboard and Tiny Basic. I have added improvements in hardware: a buzzer, a reset button, a 9V battert clip, a on/off plug, a headphone jack, volume knob, a RGB led that can be controlled programmatically, with a plug to set it off in case that you want to use the pins that the led uses for another thing, it also has an integrated knob for analog 0, and I also added a "user port" in one side, with all the pins that are not used, so if I want to plug some sensor, I can do it without opening the case. I also added 5V and 3V and GND pins, and a RX pin. All this is enclosed in a small wood box that is painted in oak color to make it look better. The software of my computer is Tiny Basic, although I learned how to add new commands, and have added some new commands. At the same time, with Liberty Basic I have made a terminal program. It can connect to the port you tell it, at the wanted speed. I have added the capability to load and send a program in txt file to the microcomputer, and also added that when I use the list command, it can save to a txt file. This way, it is easy to load and save. I love this project, it is very fun to do both soft and hardware.
Very cool. You realize that you can add fancy commands and graphics to your terminal and then extend your BASIC that way also? |
|
jordi
Full Member
A simple solution is the smarter one.
Posts: 106
|
Post by jordi on Oct 10, 2020 13:13:58 GMT -5
That sounds interesting Carl. But I am not sure of what do you mean? How graphics and commands? In the terminal?
|
|


