|
|
Post by tenochtitlanuk on Nov 12, 2020 19:15:24 GMT -5
LB5 is a bit choosy about nested structures and exiting without crashing if it doesn't like the syntax.
It doesn't help that I can't change to a fixed-width font, and it enjoys messing up my pretty-printed formatting!
Anyway, here's a working version which will generate a ppm file with area filling, Bresenham straight lines, and circles. Will add the two Bezier routines asap. Painting programs like GIMP or image-viewers, or web browsers etc will often display these natively, and the painting packages will allow you to resave as 24 bit bitmaps, GIFs, JPGs or whatever you like..
      nomainwin
    global Width, Height, CR$
    Width  =400
    Height =400
    CR$     =chr$( 10)
      dim Pix$( Width, Height)                      '   set up local pixel arrays Px( x, y) holding 'RGB' as 3 bytes)
      dim Pix( 1000), Piy( 1000)                    '   hold values in subs

      for y =0 to Height
        for x =0 to Width
            Pix$( x, y) =chr$(  min( (x *y) mod 255, 255)) +chr$( 120) +chr$( min( (x *y /100) mod 255, 255))
        next x
      next y

        for K =250 to 100 step -5
            call bresenham 100, 100,   400, K,     200, 200, 60
        next K

        for RR =10 to 150 step 10
            call circle 200, 200, RR, 0, 0, 255
        next RR
        call saveP6
        notice "Done!"
        wait
    '   ________________________________________________________________________
      sub setpixel x, y,   r, g, b
        if x >=0 and x <=Width and y >=0 and y <=Height then Pix$( x, y) =chr$( r) +chr$( g) +chr$( b)
      end sub
    sub saveP6
        open "test.ppm" for output as #fOut
            print #fOut, "P6"                                       +CR$;
            print #fOut, "# Created by Liberty BASIC"               +CR$;
            print #fOut, str$( Width +1)  +" " +str$( Height +1)    +CR$;
            print #fOut, "255"                                      +CR$;
            for y =Height to 0 step -1
                for x =0 to Width
                    print #fOut, Pix$( x, y);
                next x
            next y
        close #fOut
    end sub
    function sgn( x)
        if x>=0 then sgn =1 else sgn =0 -1
    end function
    '   ________________________________________________________________________
      sub circle cx, cy,    rd,    r, g, b
      'LOCAL f, x, y, ddx, ddy
      f     =1 -rd
      y     =rd
      ddy   =0 -2 *rd

      call setpixel cx,    cy +rd, r, g, b
      call setpixel cx,    cy -rd, r, g, b
      call setpixel cx +rd, cy,    r, g, b
      call setpixel cx -rd, cy,    r, g, b

      while x <y
        if f >=0 then
          y     = y -1
          ddy   =ddy +2
          f     =f +ddy
        end if

        x       =x       +1
        ddx     =ddx     +2
        f       =f + ddx +1

        call setpixel cx +x, cy +y,   r, g, b
        call setpixel cx -x, cy +y,   r, g, b
        call setpixel cx +x, cy -y,   r, g, b
        call setpixel cx -x, cy -y,   r, g, b
        call setpixel cx +y, cy +x,   r, g, b
        call setpixel cx -y, cy +x,   r, g, b
        call setpixel cx +y, cy -x,   r, g, b
        call setpixel cx -y, cy -x,   r, g, b
      wend

      end sub

    sub bresenham x1, y1,   x2, y2,   r, g, b
        dx =abs( x2 -x1): sx =sgn( x2 -x1)
        dy =abs( y2 -y1): sy =sgn( y2 -y1)
        if dx <dy then e =dx /2 else e =dy /2
       do
            call setpixel x1, y1,   r, g, b
          if x1 =x2 then
                if y1 =y2 then
                     exit do
                end if
        end if
          if dx >dy then
                x1 =x1 +sx: e =e -dy: if e <0 then e =e +dx: y1 =y1 +sy
           else
                y1 =y1 +sy: e =e -dx: if e <0 then e =e +dy: x1 =x1 +sx
            end if
        loop until 0
    end sub
|
|
|
|
Post by tenochtitlanuk on Nov 11, 2020 17:35:06 GMT -5
I've spent several hours on trying in LB5 - but keep hitting either bugs or syntax changes with the old way not accepted. eg in the following it happily creates an interesting ppm graphic, but as soon as I de-rem the Bresenham subroutine it errors...
      nomainwin

    global Width, Height, CR$

    Width  =400
    Height =400
    CR$     =chr$( 10)

      dim Pix$( Width, Height)                      '   set up local pixel arrays Px( x, y) holding 'RGB' as 3 bytes)
      dim Pix( 1000), Piy( 1000)                    '   hold values in subs

      for y =0 to Height
        for x =0 to Width
            Pix$( x, y) =chr$(  min( (x *y) mod 255, 255)) +chr$( 120) +chr$( min( (x *y /100) mod 255, 255))
        next x
      next y

        call saveP6
        notice "Done!"
        wait

    '   ________________________________________________________________________
      sub setpixel x, y,   r, g, b
        if x >=0 and x <=Width and y >=0 and y <=Height then Pix$( x, y) =chr$( r) +chr$( g) +chr$( b)
      end sub

    sub saveP6
        open "test.ppm" for output as #fOut
            print #fOut, "P6"                                       +CR$;
            print #fOut, "# Created by Liberty BASIC"               +CR$;
            print #fOut, str$( Width +1)  +" " +str$( Height +1)    +CR$;
            print #fOut, "255"                                      +CR$;
            for y =Height to 0 step -1
                for x =0 to Width
                    print #fOut, Pix$( x, y);
                next x
            next y
        close #fOut
    end sub

    function sgn( x)
        if x>=0 then sgn =1 else sgn =0 -1
    end function


    'sub bresenham x1, y1,   x2, y2,   r, g, b
     '   dx =abs( x2 -x1): sx =sgn( x2 -x1)
    '    dy =abs( y2 -y1): sy =sgn( y2 -y1)
     '   if dx <dy then e =dx /2 else e =dy /2
     '  do
    '        call setpixel x1, y1,   r, g, b
     '     if x1 =x2 then if y1 =y2 then exit do
      '    if dx >dy then
     '           x1 =x1 +sx: e =e -dy: if e <0 then e =e +dx: y1 =y1 +sy
      '     else
      '          y1 =y1 +sy: e =e -dx: if e <0 then e =e +dy: x1 =x1 +sx
     '       end if
     '   loop until 1 =2
    'end sub
Should produce the ppm version of this image...  |
|
|
|
Post by tenochtitlanuk on Nov 9, 2020 16:46:27 GMT -5
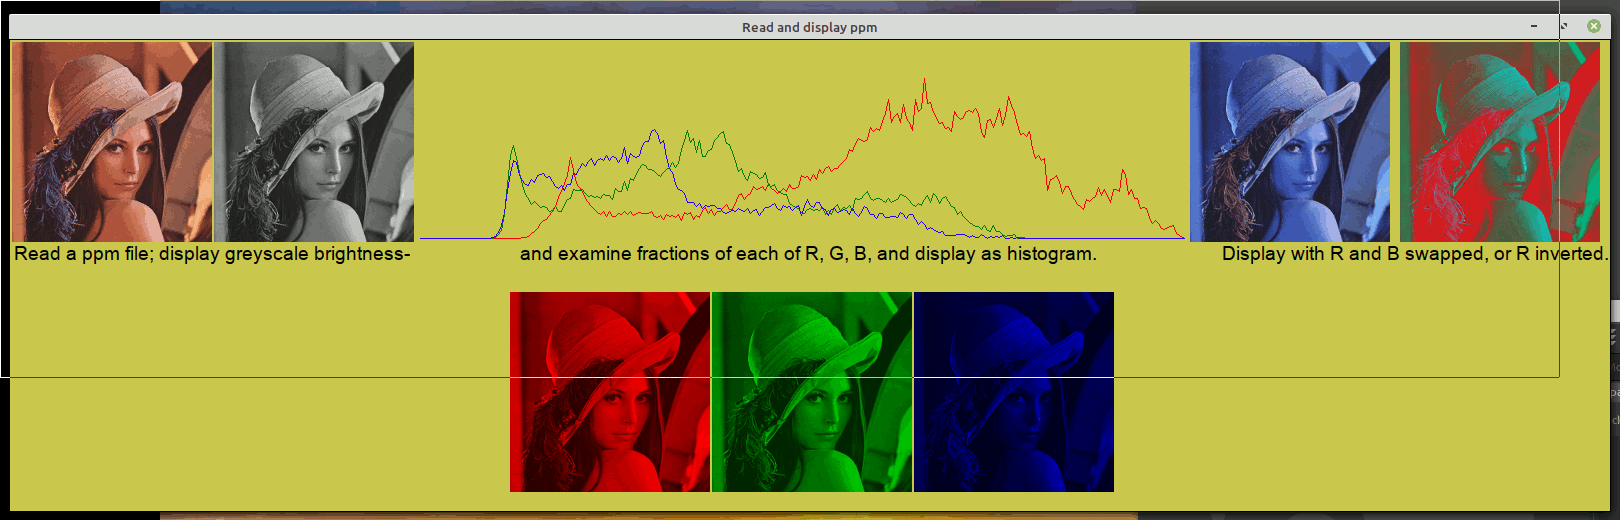
I've been having fun with the ppm P6 images I recently described. Rosetta Code has a whole block of about 8 tasks that create various images with them. Bitmap /Flood fill Bitmap Bitmap /Bresenham's line algorithm Bitmap /Bézier curves /Cubic Bitmap /Bézier curves /Quadratic Bitmap /Histogram Bitmap /Midpoint circle algorithm Bitmap /Write a PPM file I've written code that generates an image file without having to draw it to a graphic window. Everything is written to a 2D array then saved as a file. The file is four lines of ASCII text, separated with chr$( 10), then simply three-bytes for the colour of each successive pixel. It's much simpler than creating a bmp file the same way- BMPs have a huge range of variations, with long preamble sections before you hit the pixel data. This image demonstrates the routines... The great thing is that demensions are up to you- no limit to a graphic window size. And you can add custom functions like the fill which swops background colour for whatever you fancy- here a colour 2D gradient done AFTER drawing the rest of the figure. 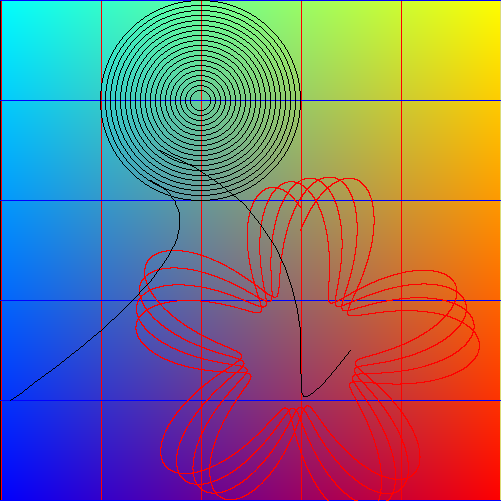 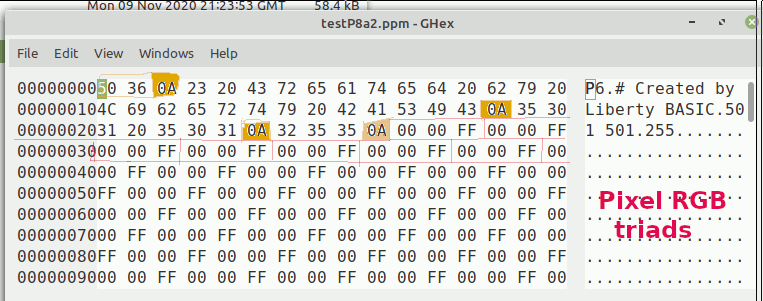 I'll finish the relevant pages on my site soon.. |
|
|
|
Post by tenochtitlanuk on Nov 7, 2020 10:47:39 GMT -5
The ability to whip up things like this in minutes is why we love LB! Code for a related 'busy lights' demo has been on my site at www.diga.me.uk/password.html for years. Some of us remember fondly the WHOPR computer! |
|
|
|
Post by tenochtitlanuk on Nov 7, 2020 10:29:49 GMT -5
..or try this, which just sets the LEDs as a graphic point..
    WindowWidth  =400
    WindowHeight =300
    nomainwin
    graphicbox #w.g1, 100 ,100, 204, 30
    button #w.b1, "killTime", killTime, LR, 50, 30
    open "Demo. of binary random count" for window as #w
    #w "trapclose quit"
    #w.g1 "down ; fill darkblue ; size 18"
    wait

    sub killTime h$
        start   =time$( "seconds")
        do
            x       =25 *int( 8 *rnd( 1))
            if rnd( 1) <0.5 then #w.g1 "color 255 90 90" else #w.g1 "color darkblue"
            #w.g1 "set "; x +12; " 15 "
            now     =time$( "seconds")
            scan
        loop until ( now -start) >=10
    end sub

    sub quit h$
        close #w
        end
    end sub
|
|
|
|
Post by tenochtitlanuk on Nov 6, 2020 7:20:04 GMT -5
I've a page at IOT using FTP to/from my websiteCode on one computer sends a control message to my website. Code on another, remote, one checks the control file and takes local action. There are easier ways nowadays! THe early LB uses were around 2003... |
|
|
|
Post by tenochtitlanuk on Nov 4, 2020 11:10:13 GMT -5
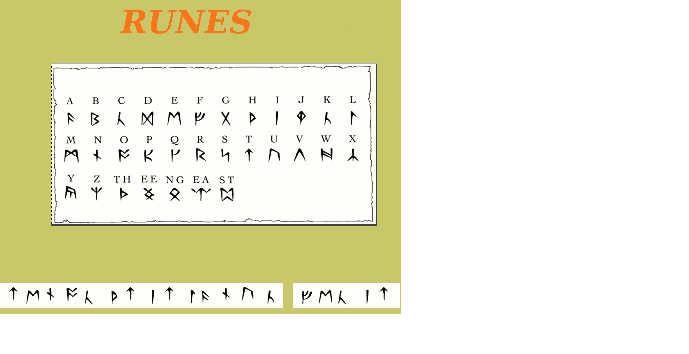
Added link to OGHAM page.
Teaser link...
|
|
|
|
Post by tenochtitlanuk on Oct 30, 2020 15:49:22 GMT -5
|
|
|
|
Post by tenochtitlanuk on Oct 30, 2020 14:53:38 GMT -5
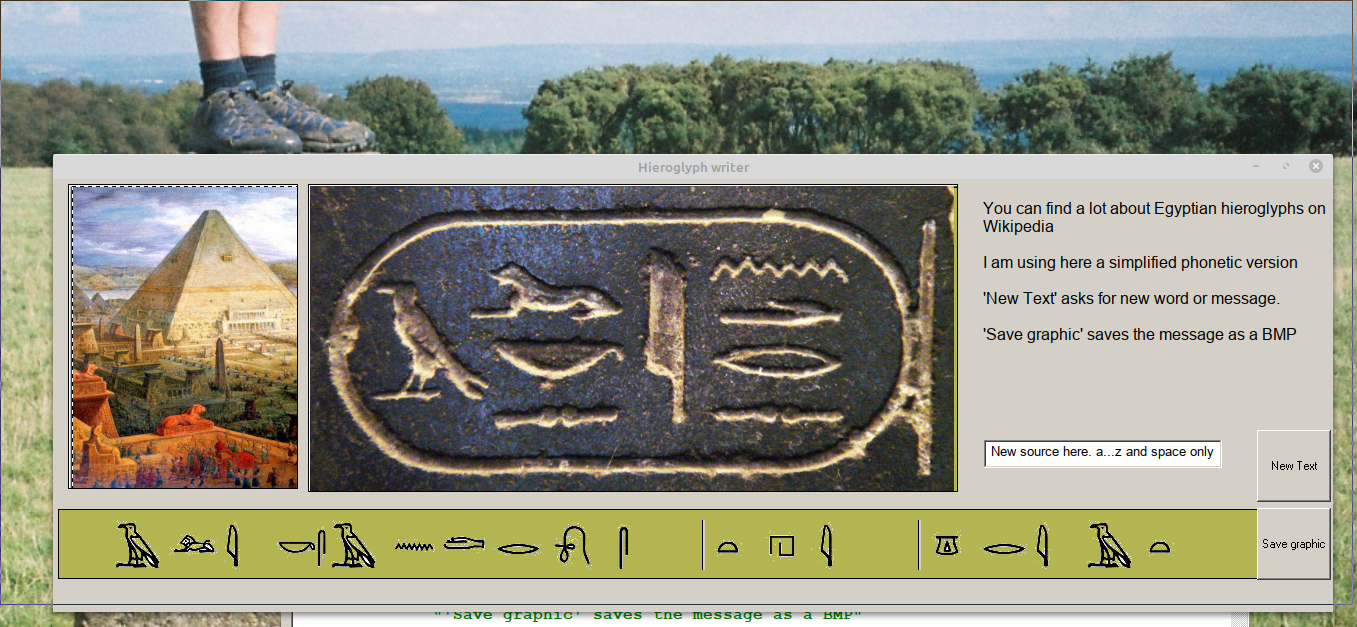
Just spent a couple of hours throwing together code to output 'secret' messages in Egyptian hieroglyphs- following my Ogham and Runic play. Will put a page on my site soon with code. The strip across is a person's name, as is the 'cartouche' photo above it.. I deliberately include part of my current screen, just for the fun effect it shows!! |
|
|
|
Post by tenochtitlanuk on Oct 27, 2020 16:41:10 GMT -5
... and the Bezier Cubic one.. 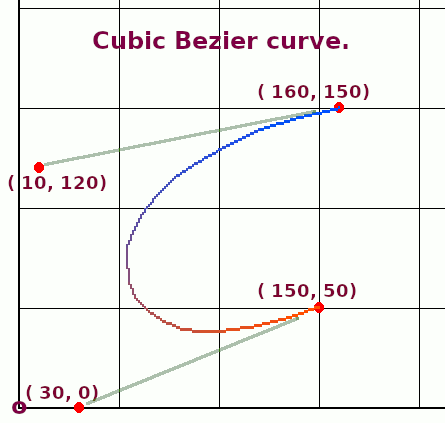
      nomainwin

      '       x   y
      dim Px( 100), Py( 100)    '   up to 100 line sections..

      WindowWidth  = 660
      WindowHeight = 680

      open "display" for graphics_nsb as #wg

      #wg "trapclose quit"

      #wg "size 2"

      for x =0 to 600 step 100
        #wg "up ;   goto "; x +20; " 620"
        #wg "down ; goto "; x +20; "  20"
        #wg "size 1"
      next x

      #wg "size 2"
      for y =0 to 600 step 100
        #wg "up ;   goto  20 "; 620 -y
        #wg "down ; goto 620 "; 620 -y
        #wg "size 1"
      next y

      #wg "down ; size 2"

      call beziercubic 160,150, 10,120, 30,0, 150,50, 20, 0,0,0

      #wg "getbmp scr 0 0 660 660"
      bmpsave "scr", "BezierCubicCurve.bmp"

      wait  '   _________________________________________________________

        '               P0         P1         P2         P3     pointNum    R G B
      sub beziercubic x1, y1,    x2, y2,    x3, y3,    x4, y4,    n,        r, g, b

        #wg "size 10 ; color red"
        #wg "set "; 20 +2 *x1; " "; 620 -2 *y1
        #wg "set "; 20 +2 *x2; " "; 620 -2 *y2
        #wg "set "; 20 +2 *x3; " "; 620 -2 *y3
        #wg "set "; 20 +2 *x4; " "; 620 -2 *y4
        #wg "size 2"

        for i = 0 to n
            t       =i /n
            t1      =1 -t
            a       =t1^3
            b       =3 *t *t1^2
            c       =3 *t^2 *t1
            d       =t^3
            Px( i)  =int( a *x1 +b *x2 +c *x3 +d *x4 +0.5)
            Py( i)  =int( a *y1 +b *y2 +c *y3 +d *y4 +0.5)
        next i

        for i =0 to n -1
            R =int( i /( n -1) *255)
            #wg "color "; R; " "; 80; " "; 255 -R
            call bresenham Px( i), Py( i),   Px( i +1), Py( i +1),    r, g, b
            'R =int( i /( n -1) *255)
            '#wg "color "; R; " "; 80; " "; 255 -R
        next i

      end sub

      sub bresenham x1, y1,   x2, y2,   r, g, b
        dx =abs( x2 -x1): sx =sgn( x2 -x1)
        dy =abs( y2 -y1): sy =sgn( y2 -y1)
        if dx <dy then e =dx /2 else e =dy /2

        do
            call setpixel x1, y1,   r, g, b
            if x1 =x2 then if y1 =y2 then exit do

            if dx >dy then
                x1 =x1 +sx: e =e -dy: if e <0 then e =e +dx: y1 =y1 +sy
            else
                y1 =y1 +sy: e =e -dx: if e <0 then e =e +dy: x1 =x1 +sx
            end if
        loop until 0

      end sub

      sub setpixel x, y,   r, g, b
        '#wg "color "; str$( r); " "; str$( g); " "; str$( b)
        #wg "set "; 20 +x *2; " "; 620 -y *2
      end sub

      sub quit h$
        close #h$
        end
      end sub

    function sgn( x)
        if x>=0 then sgn =1 else sgn =0 -1
    end function
|
|
|
|
Post by tenochtitlanuk on Oct 27, 2020 16:19:37 GMT -5
Here's the Bezier quadratic curve- two end points and one control point, joining the control points using Bresenham's algorithm. It produces a BMP file and I will add the production of the P6 ppm file and add to my web pages. The colour changes were added just to make it easier to see the segments... 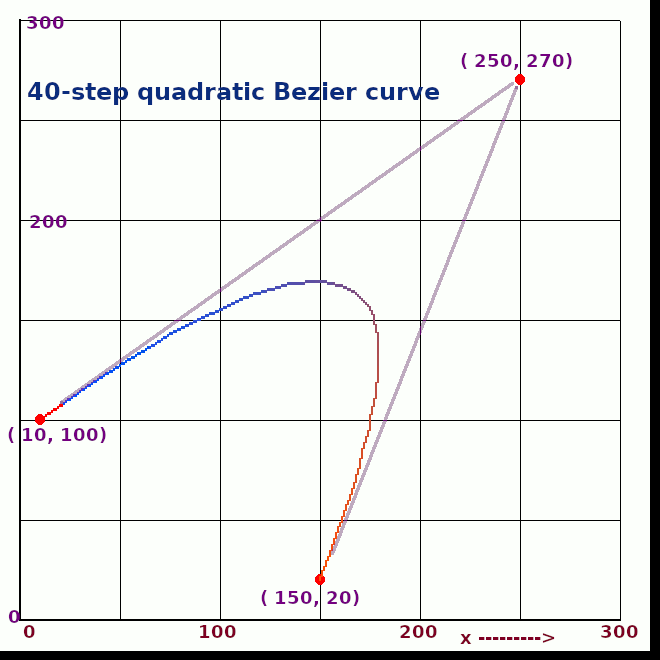
      nomainwin

      '       x   y
      dim Px( 100), Py( 100)    '   up to 100 line sections..

      WindowWidth  = 660
      WindowHeight = 680

      open "display" for graphics_nsb as #wg

      #wg "trapclose quit"

      #wg "size 2"

      for x =0 to 600 step 100
        #wg "up ;   goto "; x +20; " 620"
        #wg "down ; goto "; x +20; "  20"
        #wg "size 1"
      next x

      #wg "size 2"
      for y =0 to 600 step 100
        #wg "up ;   goto  20 "; 620 -y
        #wg "down ; goto 620 "; 620 -y
        #wg "size 1"
      next y

      #wg "down ; size 2"

      call bezierquad 10, 100,   250, 270,    150, 20,   40,    0, 0, 0

      #wg "getbmp scr 0 0 660 660"
      bmpsave "scr", "BezierQuadraticCurve.bmp"

      wait  '   _________________________________________________________

        '               P0         P1         P2     pointNum    R G B
      sub bezierquad x1, y1,    x2, y2,    x3, y3,    n,        r, g, b

        #wg "size 10 ; color red"
        #wg "set "; 20 +2 *x1; " "; 620 -2 *y1
        #wg "set "; 20 +2 *x2; " "; 620 -2 *y2
        #wg "set "; 20 +2 *x3; " "; 620 -2 *y3
        #wg "size 2"

        for i = 0 to n
            t       =i /n
            t1      =1 -t
            a       =t1^2
            b       =2 *t *t1
            c       =t^2
            Px( i)  =int( a *x1 +b *x2 +c *x3 +0.5)
            Py( i)  =int( a *y1 +b *y2 +c *y3 +0.5)
        next i

        for i =0 to n -1
            call bresenham Px( i), Py( i),   Px( i +1), Py( i +1),    r, g, b
            R =int( i /( n -1) *255)
            #wg "color "; R; " "; 80; " "; 255 -R
        next i

      end sub

      sub bresenham x1, y1,   x2, y2,   r, g, b
        dx =abs( x2 -x1): sx =sgn( x2 -x1)
        dy =abs( y2 -y1): sy =sgn( y2 -y1)
        if dx <dy then e =dx /2 else e =dy /2

        do
            call setpixel x1, y1,   r, g, b
            if x1 =x2 then if y1 =y2 then exit do

            if dx >dy then
                x1 =x1 +sx: e =e -dy: if e <0 then e =e +dx: y1 =y1 +sy
            else
                y1 =y1 +sy: e =e -dx: if e <0 then e =e +dy: x1 =x1 +sx
            end if
        loop until 0

      end sub

      sub setpixel x, y,   r, g, b
        '#wg "color "; str$( r); " "; str$( g); " "; str$( b)
        #wg "set "; 20 +x *2; " "; 620 -y *2
      end sub

      sub quit h$
        close #h$
        end
      end sub

    function sgn( x)
        if x>=0 then sgn =1 else sgn =0 -1
    end function
|
|
|
|
Post by tenochtitlanuk on Oct 24, 2020 16:25:45 GMT -5
If you can receive the byte-stream and save to a file, and post it here for us, we could probably help. Or just the sections you can't at present understand/decode. But there are a whole range of BCD codings- it would help if you know what the binary-coded parts should look like. eg if you know it is supposed to hold four decimal digits but only two bytes are received, then it has to be 4-bits per digit. Or if the received bytes are between zero and 9 and the upper bits are always zero, it is obviously one decimal value per byte) Once you know the digits you simply add them each multiplied by 1, 10, 100, etc. I recommend using a hex editor to study the file of the transmitted data stream. 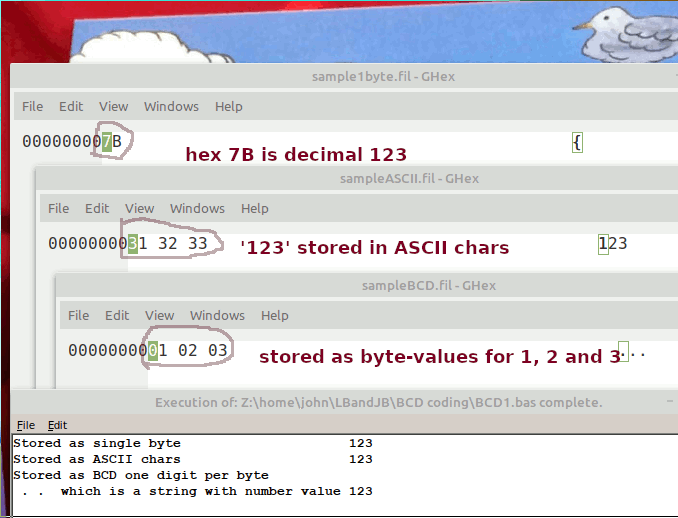
'   Here are three ways to save number data...
    a  =123 '   example datum value =123

'   if an integer in range 0 to 255...
    out1byte$ =chr$( 123)

    open "sample1byte.fil" for output as #fOut
        #fOut, out1byte$;
    close #fOut

    open "sample1byte.fil" for input as #fIn
        i$ =input$( #fIn, 1)
    close #fIn
    print "Stored as single byte",, asc( i$)


'   if to store in ASCII, or BCD with one byte per digit..
    a$ =str$( a)

    for i =1 to 3
        outASCII$ =outASCII$ +mid$(       a$, i, 1)
        outBCD$   =outBCD$   +chr$( val( mid$( a$, i, 1)))
    next i


    open "sampleASCII.fil" for output as #fOut
        #fOut, outASCII$;
    close #fOut

    open "sampleASCII.fil" for input as #fIn
        i$ =input$( #fIn, lof( #fIn))
    close #fIn
    print "Stored as ASCII chars",, i$


    open "sampleBCD.fil" for output as #fOut
        #fOut, outBCD$;
    close #fOut

    open "sampleBCD.fil" for input as #fIn
        i$ =input$( #fIn, lof( #fIn))
    close #fIn

    print "Stored as BCD one digit per byte",
    for j =1 to 3
        m$  =mid$( i$, j, 1)
        v   =asc( m$)
        o$  =o$ +chr$( 48 +v)
        'print m$;
    next j
    print ""
    print " . .  which is a string with number value "; val( o$)

    end
|
|
|
|
Post by tenochtitlanuk on Oct 24, 2020 12:12:31 GMT -5
Are you issuing a 'flush'?
print #handle, "flush"
Help file- This command ensures that drawn graphics 'stick'.
Each time a flush command is issued after one or more drawing operations, a new group (called a segment) is created. Each segment of drawn items has an ID number. The segment command retrieves the ID number of the current segment. Each time a segment is flushed, a new empty segment is created, and the ID number increases by one. See also the commands cls, delsegment, discard, redraw, and segment.
to the graphics?
|
|
|
|
Post by tenochtitlanuk on Oct 22, 2020 9:52:45 GMT -5
I've posted before and linked to my website- and these tasks are still empty on Rosetta Code. I just realised I had not linked to the further example at link which are related but not on the index of my site...
The Rosetta Code tasks include- ' create a ppm file
' fill an image with a plain RGB color,
' set a given pixel with a color,
' get the color of a pixel.
' Bresenham draw line
' Convert image to grayscale;
' Compute the histogram
' Find the median: defined as the luminance such that the image has an approximately
' equal number of pixels with lesser and greater luminance.
' Replace each pixel of luminance lesser than the median to black, and others to white.
Along with the Bresenham one, which gives a particularly fun real-time display and is also already on my site, and lena, I've essentially covered all these. Fun.. |
|
|
|
Post by tenochtitlanuk on Oct 16, 2020 14:17:18 GMT -5
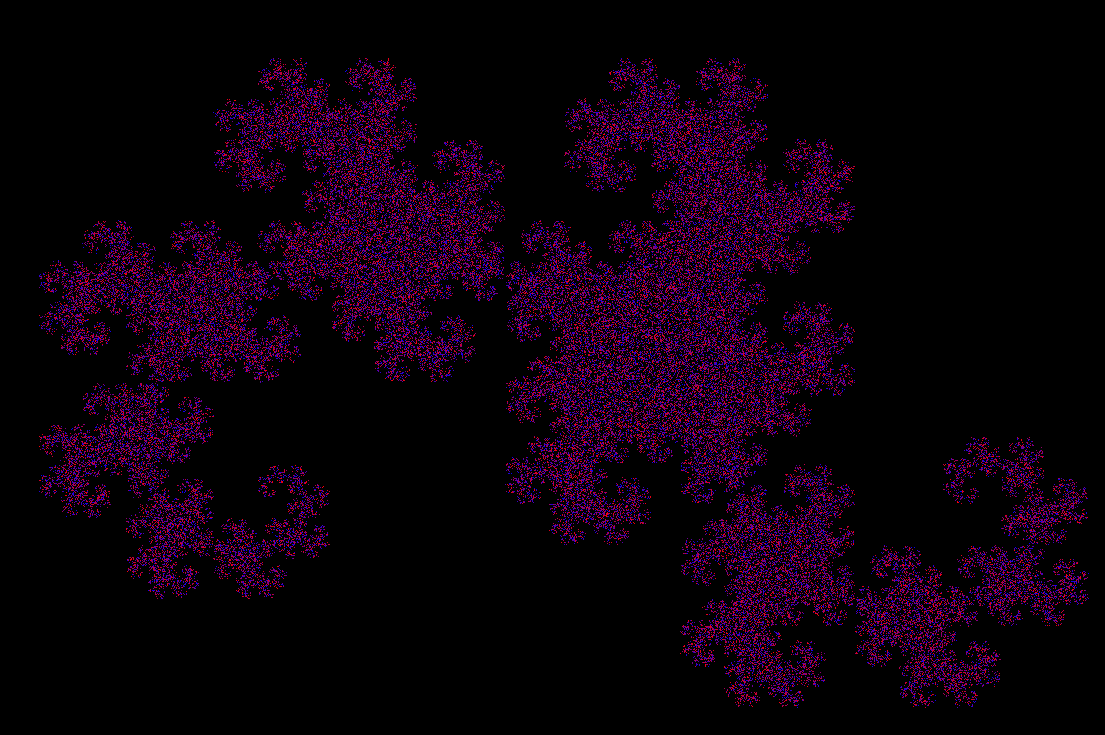
The Dragon Curve is an interesting space-filling curve that can be coded by two very different algorithms. I've had a post on one method on my LB site for a long time that uses turtle graphics. Now I've coded the completely different IFS method which builds up as a dot bounces around following a simple rule. This time just a still screengrab here...
I'll update the website with the newer code in a few days. Might put one or both up on Rosetta Code?? |
|